Monday, 17 September 2012

How to Export Data (Test cases) from EXCEL sheet to HP Quality Center 11

PART-1: How to Upload Data (Test cases) from EXCEL sheet to HP QUICK Center 11.0
Solution: To upload the data successfully from Excel sheet to HP QC, please follow the below mentioned steps,
1.      Invoke HP QC URL (e.g. http://test001:8080/qcbin/) that installed on you’re the server.


2.      Click on Add-Ins link displayed on above page and then click on “HP Quality Center Connectivity link displayed on new window (see below)


3.      After clicking on above mentioned link, new window pops up


4.      Click on “Download Add-in link. Download and install HP Quality center Connectivity Add-in.


5.  Now install MS Excel Add-in by clicking on “More HP ALM Add-inspresent on below link


6.    Install MS Excel Add-in by clicking on above link.

7.    After installing MS Excel Add-in, Re-open MS Excel if it’s already open otherwise open new Excel with Test data (Test cases) that you want to export to HP QC.

8.    Now you can see new Add-in “Export to HP ALM” under Add-Ins tab.


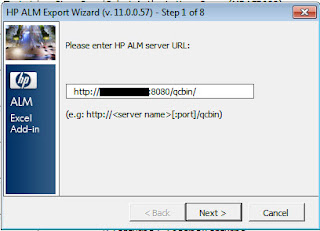
9.    Click on “Export to HP ALM” tab, and new HP window pops up (which ask you to enter HPALM server URL).


10.  Enter valid user credentials (user id and password) and click on next.


11.  Select valid Domain and Project name and click on next


12.  Select valid type of data and click on next


13.  Type a new map name and click on next


14.  Do correct mapping of excel sheet’s column with HP ALM and click on Export


15.  System displays success message and you can see test cases should be uploaded to HP QC under Test Plan link.


Tuesday, 6 March 2012

Complete process to install oracle 11g

Step 1: First you must find out which Operating system do you have on ur system (32 bit or 64 bit Window).
Step 2: If you 've relevant oracle 11g setup then start installation otherwise click on the below link to install it from Oracle site,
Do the following changes in regedit if your system is 64 bit,
HKEY_LOCAL_MACHINE\SOFTWARE\Microsoft\MSDTC\MTxOCI     and
HKEY_LOCAL_MACHINE\SOFTWARE\Wow6432Node\Microsoft\MSDTC\MTxOCI
are correct:
a. OracleOciLib = oci.dll
b. OracleSqlLib = orasql11.dll   (old: SQLLib80.dll)
c. OracleXaLib = oraclient11.dll  (old: xa80.dll)  

 
Step 3: Update TNSNAMES files according to your system DB config,
By default, TNSNames file is under below location,
C:\app\vinod\product\11.2.0\client_1\Network\Admin\
Settingup Environment variables
you should set the TNS_ADMIN environment variable to point to where ever you store your tnsnames.ora file


Adding DNS name in following tabs in Microsoft DBC Admin wizards
                - USER DSN
                -SYSTEM DSN

Adding editing TNSNAMes files,  then do the ODBC setting and automatically TNS names that you edited in TNSNames file, it populates right under TNS service name dropdown list.

Thats the whole process of installlation. Hope it will work for you ...
Cheers.